The trend of increasing wind turbine blade length continues in order to maximize extracted power and operational efficiency. However, with this trend, blade manufacturing becomes more difficult. Ensuring consistent quality over >100m blades with complex lay-ups and resin infusion processes is especially challenging. Glass fabrics must be laid precisely into molds and stay in place during the resin infusion process. Through incorrect fabric placement or via an imperfect resin infusion process, out-of-plane wrinkles can occur within the bulk laminate that are not detectable visually. Such wrinkle scan led to a reduction in the strength of the blade. Without the ability to identify and eliminate such wrinkles, knockdown safety factors need to be applied which adversely impact the weight and thus the efficiency of the blade.
Accordingly, an inspection services company provided dolphitech with a section of a wind turbine blade made from GFRP and known to contain natural wrinkles to assess the capability of the dolphicam2. The section is 56 cm × 15 cm in width and height, while the thickness varies due to substantial delamination on the back face. As a very rough measurement, the thickness is ~20 mm. Figure 1 shows photographs of the sample.

Figure 1. Photographs of the provided wind turbine blade section. (a) is the inspection face and (b) is the back face.
SOLUTION
The wind turbine blade sample was inspected using a dolphicam2+ and a TRM-EC-1.5 MHz transducer module (TRM) with the addition of an ODI – single probe wheel encoder to acquire encoded scans.
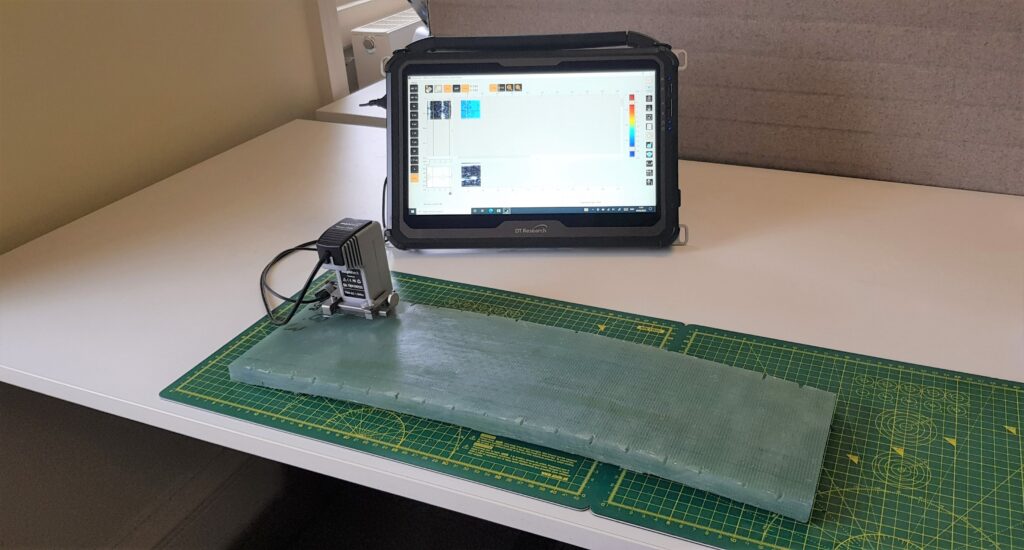
Figure 2. Photograph of dolphicam2+ with TRM-EC-1.5 MHz and ODI – single probe wheel encoder.
The TRM-EC-1.5 MHz is a low-frequency transducer designed to penetrate thick materials and structures. The TRM has a 12 mm delay line made from Aqualene, a rubbery material that enables good conformance to rougher and slightly curved surfaces. The ODI – single probe wheel encoder provides positional data to allow areas larger than the transducer aperture to be mapped quickly.
Encoded scans covering the convex inspection face were taken along with separate scans of smaller sections containing wrinkles. The scans were stored as full datasets including all A-scan data allowing the scans to be interrogated and the gates changed in retrospect. The system can toggle quickly between displaying the data either as amplitude or thickness (ToF), which will be respectively plotted in a grayscale and rainbow color palette.
Standard ultrasonic gel was used as a couplant.
CHALLENGES
The attenuative nature of GFRP meant our low-frequency traducer was used. Furthermore, the material has a slightly rough finish and there is a slight curvature. This makes it harder for the transducer to conform to the sample. The Aqualene delay line of the TRM-EC-1.5MHz helps ensure good contact with the part during inspection. The wrinkles themselves are fairly subtle, low amplitude indications, which require sensitive ultrasonic testing equipment to detect and characterize.
FINDINGS
As discussed, full data sets were stored allowing the scans to be interrogated and the gates changed in retrospect. By gating to exclude the back wall, we were able to observe wrinkles as higher amplitude linear features in the amplitude view as shown in Figure 3. The depths of these indications can be visualized in the thickness (ToF) view with a suitable amplitude threshold, see Figure 4. In Figures 3 and 4, three main wrinkles are labeled and numbered. These labels will be used later in this section.
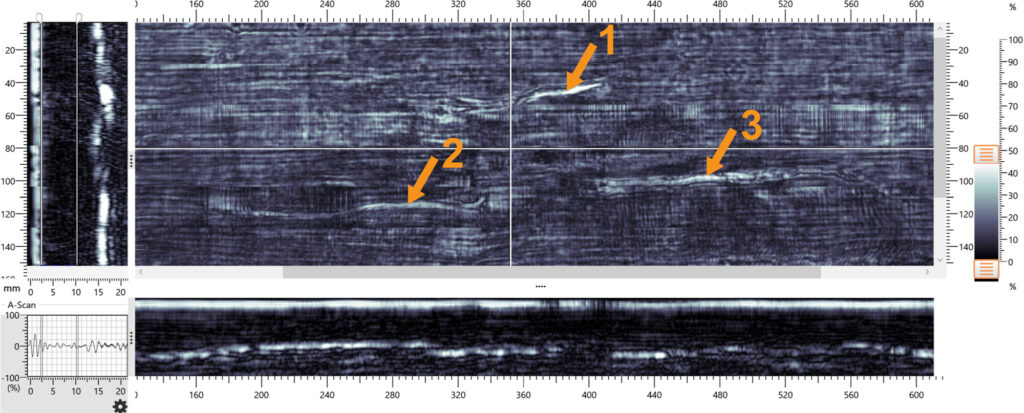
Figure 3. Amplitude view where data is gated to exclude the back wall.
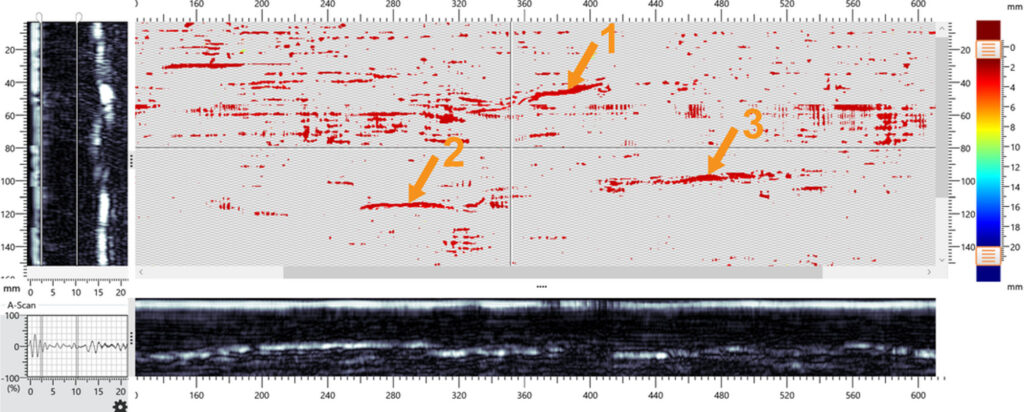
Figure 4. Thickness (ToF) view where data is gated to exclude the back wall, and an amplitude threshold is applied.
Gating to include the back surface results in Figures 5 and 6 for the amplitude and thickness (ToF) views respectively. In the amplitude view (Figure 5), it is possible to see a textured image indicating that there are inconsistencies in the back wall echo amplitude. In the thickness (ToF) view (Figure 6), it is possible to see that the inconsistencies are caused by the variable thickness of the part, which ranges from ~12?mm to 19 mm.
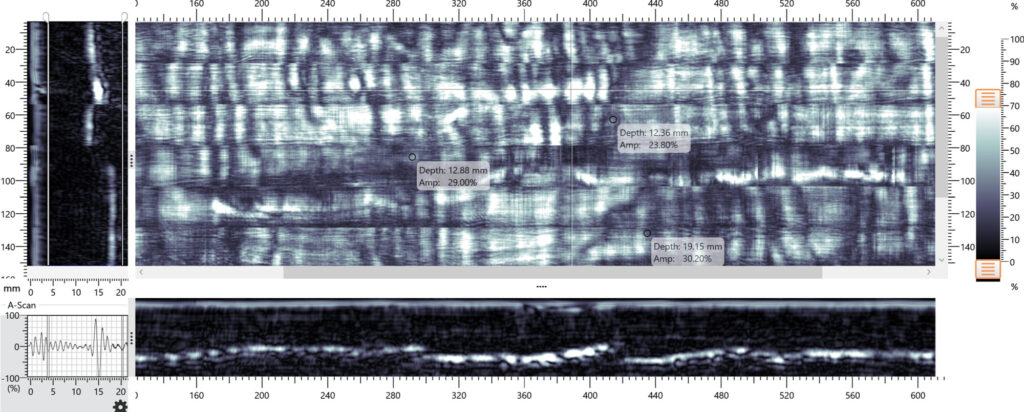
Figure 5. Amplitude view where data is gated to include the back wall.
Scans of smaller sections containing the three main wrinkles labeled previously are shown in Figure 7. On these scans, measurement markers have been applied, where the amplitude view has line measurement markers, and the thickness (ToF) view has point measurement markers. Table 1 displays a summary of the measurements obtained.


Figure 7. Amplitude and thickness (ToF) views for three wrinkles. Data is gated to exclude the back wall and the ToF view has an amplitude threshold applied.
Table 1. Measured dimensions. The depth uses average reading from the point measurement markers and the value is given to a precision of two decimal points.

CONCLUSION
The sample was successfully inspected with a dolphicam2+ and a TRM-EC-1.5MHz transducer, with the addition of an ODI – single probe wheel to map larger sections quickly.
The data produced is well-suited for the detection and analysis of both wrinkles and delamination's. The component was found to be feature-rich, with near-surface wrinkles and splitting delamination's on the back face of the sample being clearly visible.
The ability to view the data as both amplitude and thickness (ToF) enables complementary analysis. The wrinkles were detected in the amplitude view, using an internal gate, and characterized using both the amplitude view and the ToF view. The back wall delamination's were best detected using an external gate in the ToF view, where the thickness variation was also characterized.
The full dataset save functionality enables data to be re-gated and analyzed retrospectively. This allowed both near-surface wrinkles and delamination's on the back face to be inspected from one scan.


